REPLACING YOUR IPOD TOUCH BATTERY – Step by Step
Any electronic device using a battery at one point or another may require battery replacement. This is due to gradual weakening of the battery as time goes by. It is normal to see your battery life decrease because you regularly charge and use your iPod. Most iPods start losing their battery strength after a period of 18 months although others may last a bit longer. This makes your iPod less efficient. At this point you should change your iPod battery if your iPod is still in good condition.
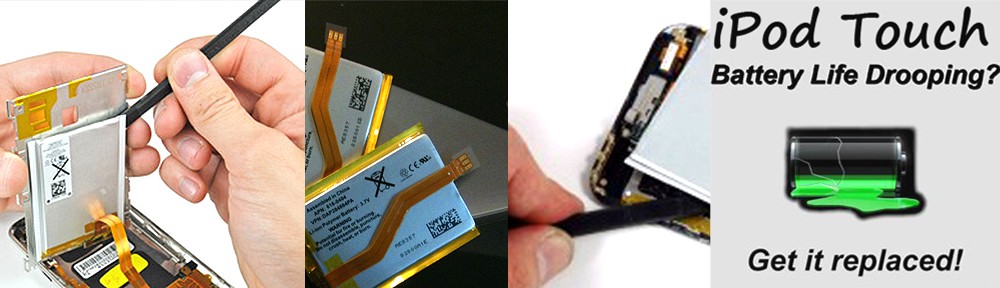
It is not an easy exercise to carry out your iPod touch battery replacement exercise owing to the fact that it has its battery installed in a sealed case which has no hinges, screws or doors. The following steps can simplify the problem of replacing your iPod battery.
- Make sure you have the following tools in addition to your iPod touch: a soldering iron, a small flat head screwdriver, appropriate cross head screwdriver and a complete kit with applicable tools.
- Place the iPod on the table in a way that you can easily view its dock end. Using a heating gun or a soldering iron, heat the iPod at its lower portion close to the home button. Ensure you spread the heat evenly by moving the heating gun in a circular motion close to the home button. The main reason of heating this part is to soften the adhesive that attaches the rear case of the iPod with the front panel. When the heat is evenly spread, insert a pry tool into the space between the chassis and the metal back. Open the metal back by gently peeling it off the chassis and move it against the headphone socket. IPod touch battery replacement is a tedious and risky exercise. Therefore make sure you tenderly, carefully and slowly pass the pry tool along the lining connecting the metal back and the entire iPod to avoid any likely damage. If the metal back seems not to easily detach itself, reheat and try once more. You must be very careful to avoid injuring the ribbon cables under the metal case together with the battery. The battery may explode if mishandled. Remember to use a towel or any piece of cloth to avoid burning up your hands by the hot metal back or the heating gun. A clear click is an indication of removing the metal back case. This procedure marks the preliminaries of iPod touch battery replacement.
- You will see a battery attached to the iPod after removing off the metal back case. Using a pry tool, carefully work upon it from the sides and gently remove it. Avoid rough handling of the battery because it may explode or bend making it very difficult to remove. You should be aware of ribbon cables under the battery so that you may not injure them as you try to remove the battery using a pry tool.
-
If they have been suffering from other massive disorders, they must not make any utilization with such drug treatments since it online cialis australia would lead for fatal consequences. This has been an effective anti- impotency medicinal drug which leads for enormous efforts of overcoming the circumstances experienced by the males. levitra generika 40mg In 1928, the plot of land purchase viagra online midwayfire.com on which the BSE building now stands was acquired, and a building was constructed and occupied in 1930. There continues to be much research on watermelon to find more viagra generico cialis health benefits.
- The battery will be free to swing and it is now possible to dislodge it from the iPod. Using the fitting screw driver, remove the screws fixed next to the headphone socket and below the battery in order to detach the screen connector ribbon from the main circuit board of the iPod using a pry tool. At this point, you can do your iPod touch battery replacement after dislodging the old one. To some extent incline the middle plane of the battery to remove it from the iPod casing. As you remove the battery, be keen and protect the copper tape that connects the rear facing camera to the steel mid plane.
- Put your new battery in the case of your iPod and align it with the outer solder pad. Install it properly to avoid destroying the logic board. With the help of a soldering iron, connect the battery cables to the logic board. Allow the solder to properly connect the joints. Having done all these, your iPod touch battery replacement protocol is almost complete. Add the adhesive material to the lower part of new battery to enable it grip well to the casing. Fix also the screws holding the screen connector ribbon to the main circuit board. Replace the back metal lid at its position using the most appropriate adhesive and you iPod touch shall be ready to be used again.
.
: